Yellow drips and streaks on bathroom walls are a common, unsightly problem that can make an otherwise clean bathroom feel dirty. These persistent marks are often more than just surface grime; they indicate a deeper interaction between moisture, air, and paint. Understanding the cause is the first step toward effective cleaning and prevention. Quality Cleaning Services helps homeowners tackle these stubborn issues, ensuring bathrooms are truly spotless.
Those unsightly yellow drips running down your bathroom walls are often a tell-tale sign of moisture issues. Addressing them effectively involves understanding their origin and applying the right cleaning and preventative measures.
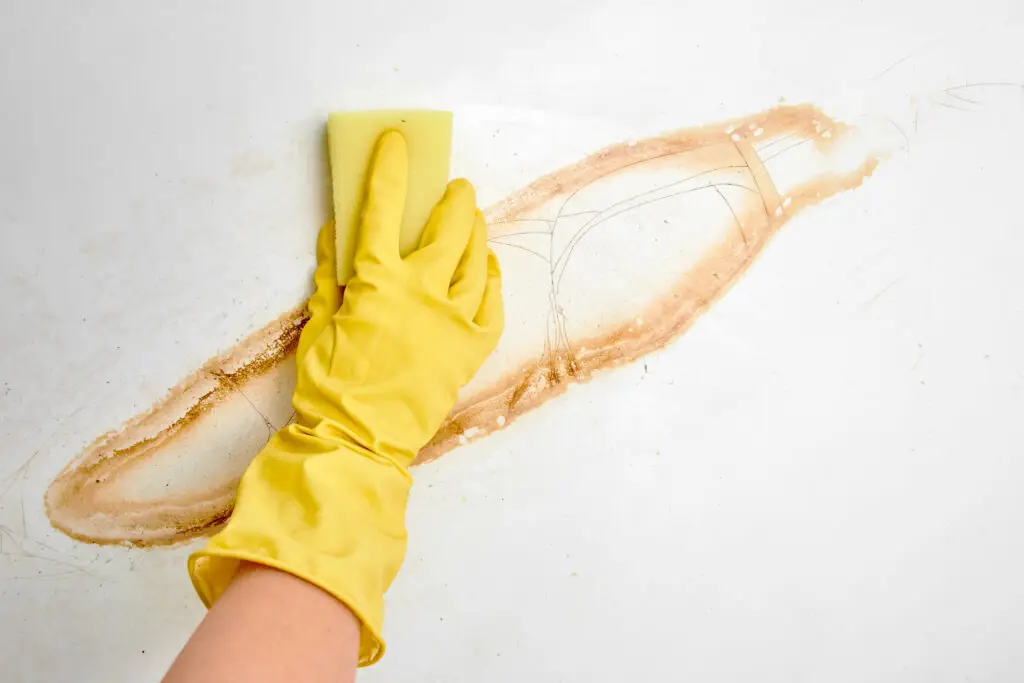
What are those yellow drips?
The yellow drips on bathroom walls are most commonly caused by a phenomenon known as surfactant leaching, often combined with other airborne particles.
- Surfactant Leaching: This is the primary culprit. Paint contains surfactants, which are chemicals that help the paint bind together and give it its color and consistency. In high-humidity environments like bathrooms, steam and condensation can draw these surfactants to the surface of the paint. When the water then evaporates, the sticky, yellowish, or brownish residue (the leached surfactants) is left behind, often in drip patterns. It’s more common in new paint jobs (within the first year) or if the bathroom is very humid during the paint’s curing process.
- Soap Scum & Body Oils: Over time, airborne particles of soap scum, body oils, and shampoo residue, propelled by steam, can settle on bathroom walls. When condensation forms and runs down, it collects and re-dissolves these particles, creating yellow or brownish streaks.
- Dust & Dirt Accumulation: Everyday dust, dirt, and even tiny fibers accumulate on walls. In a humid bathroom, these particles can mix with condensation and run down, leaving dirty, discolored streaks.
- Nicotine Stains (Less Common in Modern Homes): In homes where smoking has occurred indoors, nicotine and tar residues can build up on walls. When exposed to humidity, these can liquefy and drip, leaving dark yellow or brownish streaks.
- Insufficient Ventilation: Any of these causes are exacerbated by poor bathroom ventilation. When steam and humidity have no way to escape, they linger on surfaces, providing the moisture necessary for surfactants to leach or for airborne grime to dissolve and drip.
Cleaning techniques that work
The key to cleaning these drips is a gentle approach, as harsh scrubbing or improper cleaners can damage the paint. Always test your chosen cleaning method in an inconspicuous area first.
Warm Water & Soft Cloth:
- Method: For fresh or very light drips, sometimes all you need is a clean, soft microfiber cloth dampened with warm water. Gently wipe the drips from top to bottom.
- Why it works: Often, the drips are water-soluble and can be removed before they fully dry and set in.
Mild Dish Soap & Water:
- Method: Mix a few drops of mild dish soap (like a gentle dishwashing liquid) with warm water in a spray bottle or a bucket. Lightly spray the affected area or dampen a clean cloth with the solution. Gently wipe the drips from top to bottom.
- Why it works: Dish soap is excellent at cutting through grease and oils (like those found in soap scum or leached surfactants) without being overly harsh on paint.
White Vinegar Solution:
- Method: Mix 1 part white vinegar with 2 parts warm water in a spray bottle. Lightly spray the affected area. Let it sit for 5-10 minutes. Gently wipe with a clean, damp cloth, then follow with a wipe of plain water to remove any vinegar residue.
- Why it works: Vinegar is mildly acidic and effective at dissolving mineral deposits (from hard water), soap scum, and often helps with mold/mildew traces that might be part of the drip. It also helps neutralize odors.
Baking Soda Paste (for stubborn spots):
- Method: For more stubborn, localized drips, make a paste with baking soda and a small amount of water. Apply the paste directly to the drip and let it sit for a few minutes. Gently rub with a soft, damp cloth or sponge, then rinse thoroughly with a clean, damp cloth.
- Why it works: Baking soda is a mild abrasive that can gently lift stains without scratching, and it helps absorb odors.
Commercial All-Purpose Cleaner (Non-Abrasive):
- Method: Choose a reputable all-purpose household cleaner that is labeled as safe for painted surfaces. Spray onto a clean cloth (not directly on the wall) and gently wipe the drips. Always follow product instructions and rinse thoroughly.
- Why it works: These are formulated to break down various types of grime. Always avoid harsh, abrasive, or highly acidic/alkaline cleaners.
Important cleaning tips:
- Always test first: Before applying any cleaner to a large area, test it on a small, inconspicuous spot (e.g., behind a door, in a closet) to ensure it doesn’t discolor or damage your paint.
- Work from top to bottom: When cleaning an entire wall, start from the top and work your way down to prevent drips from dirty cleaning solutions.
- Avoid over-wetting: Use a damp cloth, not a soaking wet one. Excessive moisture can damage drywall or paint.
- Rinse thoroughly: Always follow cleaning with a wipe of clean water to remove any cleaner residue, which can attract more dirt over time.
- Dry immediately: After cleaning, gently pat the area dry with a clean, soft towel to prevent new drips or moisture issues.
Choosing the right cleaner based on paint type
The type of paint on your bathroom walls significantly impacts which cleaners you can safely use. Bathroom paints are typically designed to be more durable and washable than paints in other rooms.
- Satin, Semi-Gloss, and Gloss Paints (Most Common for Bathrooms):
- Characteristics: These paints have a higher sheen, which makes them more durable, moisture-resistant, and easier to clean. They are designed to withstand scrubbing.
- Safe Cleaners: Generally, mild dish soap and water, white vinegar solution, or diluted non-abrasive all-purpose cleaners are safe. For tough spots, a baking soda paste is usually fine. These paints are robust enough for most gentle cleaning methods.
- Eggshell and Pearl Paints:
- Characteristics: These have a subtle sheen, offering a balance between durability and a softer look. They are more washable than flat paints but less so than satin or semi-gloss.
- Safe Cleaners: Stick to very mild dish soap and water, or a dilute vinegar solution. Avoid vigorous scrubbing or abrasive cleaners, as they can burnish (create shiny spots) or dull the finish. Gentle wiping is key.
- Flat and Matte Paints (Rarely Used in Bathrooms, but Possible):
- Characteristics: These paints have no sheen and are the least durable and washable. They absorb moisture easily and show marks more readily.
- Safe Cleaners: These are very difficult to clean without damaging the finish. Often, the best approach is a very gentle wipe with a barely damp cloth and plain water. Any scrubbing or cleaning products, even mild ones, are likely to leave water marks, streaks, or remove paint. In many cases, repainting might be the only solution for significant drips on flat paint.
General Rule: The higher the sheen, the more durable and washable the paint. Always err on the side of caution and start with the mildest cleaning method.
Preventing recurrence: Humidity, ventilation & paint tips
Cleaning the drips is a temporary fix if the underlying issues aren’t addressed. Prevention is key to keeping those yellow streaks away.
- Improve Ventilation (Most Important Step):
- Use Exhaust Fan: Turn on your bathroom exhaust fan before you step into the shower and let it run for at least 15-20 minutes after you’re done. This is crucial for expelling humid air. Ensure your fan vents to the outdoors, not just into the attic or wall cavity.
- Open a Window/Door: If you don’t have an exhaust fan, or even if you do, open a bathroom window (if outdoor humidity is lower) and/or leave the bathroom door ajar during and after showering to promote airflow.
- Control Humidity:
- Wipe Down Surfaces: After showering, quickly wipe down shower walls, glass doors, and tiles with a squeegee or towel to remove moisture. This reduces the amount of evaporation that contributes to room humidity.
- Consider a Dehumidifier: In very humid climates or bathrooms with poor natural ventilation, a small bathroom dehumidifier can help maintain optimal humidity levels (ideally 30-50%).
- Use Proper Bathroom Paint:
- Moisture-Resistant Formulas: When repainting, choose paints specifically labeled for bathrooms. These are typically moisture- and mildew-resistant, often with satin or semi-gloss finishes that are more washable and less prone to surfactant leaching.
- Allow Proper Curing: If your paint is new, ensure it has ample time to cure fully before exposing the bathroom to high humidity. This process can take several weeks. Proper ventilation during this time is critical.
- Clean Regularly (General Bathroom Cleaning):
- Regularly wipe down bathroom walls, especially near the shower, with a damp cloth to remove dust, soap scum, and airborne particles before they have a chance to build up and contribute to drips.
- Dust ceiling fans and light fixtures, as dust can mix with condensation.
- Check for Leaks: Ensure there are no hidden leaks from pipes or the roof that could be causing constant dampness behind walls.
By implementing these preventative measures, you significantly reduce the chances of yellow drips reappearing, keeping your bathroom looking fresh and clean for longer.
Don’t let yellow drips detract from your bathroom’s sparkle. For expert cleaning solutions and preventative advice tailored to your home’s needs, trust Quality Cleaning Services to restore the pristine look of your bathroom walls.